Review: KickBeat

KickBeat – Special Edition
box_kickbeat_w160
Cost
$9.99
Format
Digital
Size
879.54 MB
Available On
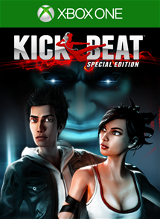
Xbox ONE [Reviewed], PS4, PS3, Vita, WiiU
Release Date
9/26/2014
Developer
ZEN Studios
Publisher
ZEN Studios
Modes
Single Player / Split Screen

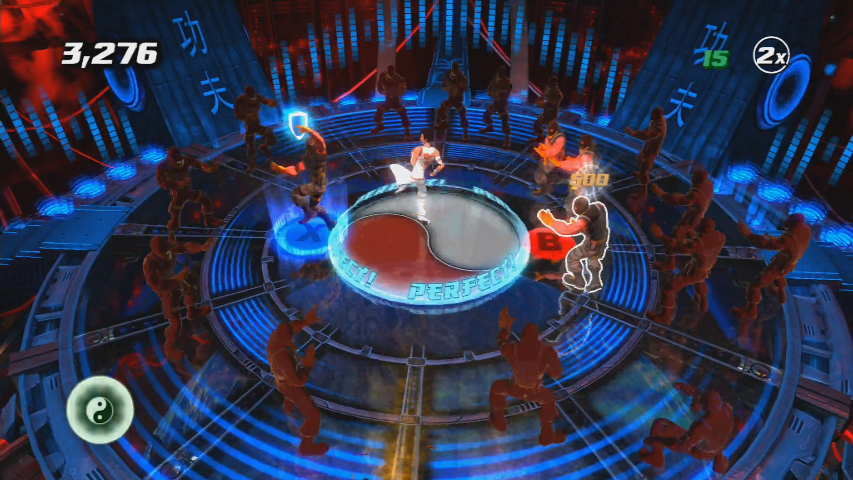
KickBeat is ZEN Studios’ take on a music and rhythm game played with a controller that has a combat twist. Unlike other music and rhythm games where you have arrows or different colored dots flying at you, KickBeat replaces those mundane items with circling enemies. Enemies that want to cause you great pain.

The objective of the game is to counter the enemies attacks, in rhythm to the music, using the A, B, X, and Y buttons as they attack you. When countering enemies you are rewarded with ‘chi’, which will fill your chi meter below your feet. Collecting enough will allow you to activate your special power which will double your score for your counters, just like star power in the Guitar Hero games. If you fail to counter an enemy you get hit and lose some health. If your health fully depletes, you fail the track and have to start over. Each track is graded out of 5 stars dependent on your score with elusive red stars to be earned in the higher difficulties for near perfect runs.

There are four main types of enemies; Orange enemies – they attack one at a time, Blue enemies – they attack in quick succession, Red enemies – attack simultaneously and Yellow enemies – linked together, you need to press and hold the required button when the first enemy attacks, then release the button when the second enemy attacks.

Some enemies will have a bonus or power-up above their heads when they attack you. To collect them, you need to double tap the button they attack you on, which will actually be incorporated into the rhythm of the track. There are two types of bonuses; a multiplier bonus and a score bonus. The multiplier bonus when collected, increases your multiplier and the score bonus adds 500 points to your score.

As for the power-ups, there are four different types, a health boost, a chi boost, a shield and a shockwave. The health boost replenishes some of your health, and the chi boost does the same for your special. The shield will protect you from incoming attacks for a short period of time and the shockwave destroys all enemies that are circling you getting ready to attack. I only ever used them if I got hit and struggled to find the rhythm again. If you pick up a shield of shockwave power-up whilst already holding one, the one you are holding will be removed and the new one will take its place but it isn’t much of an issue because they pretty much give you the same amount of time to recover your rhythm.

Bonuses

 
The story begins with the Sphere of Music being stolen by Mr Halisi, the owner of Radio Earth. His sole intention being complete control over all music. Master Fu, the guardian of the Sphere of Music tasks Lee with finding Mr Halisi and reclaiming the Sphere of Music so the World can once again listen to music. So Lee travels the world in search for the Sphere of Music and encounters countless enemies trying to stop him in his tracks.

The story is split into two parts. Part one, you play as Lee and part two you play as Mei, Master Fu’s Granddaughter. The last track of each venue is a boss battle, but it is essentially the same game play, just with different things attacking you.

After each venue which consists of up to four tracks to fight through, you are presented with some beautifully hand-drawn cut scenes. The voice acting throughout the cut scenes are pretty good all in all and I found myself laughing at a couple of the jokes too (my favorite being the Justin Beiber dig in the cut scene below).

With the game having 24 tracks, running anywhere between two and a half minutes and six minutes, you are looking at Lee’s story taking you roughly two hours. Mei’s story will take exactly the same amount of time, and this is where I was disappointed.

Although the story line is slightly different for Mei, and the cut scenes are different, the game play is identical. You play through exactly the same venues with exactly the same songs, just with a different character stood in the middle of the arena. I personally would have preferred the two story lines to have 12 songs in each so you didn’t have to essentially play through the same track list twice.

This leads me to the greatest part of the game in my opinion. The track list. I was absolutely blown away by the tracks. Each track just got better and better and I found myself looking forward to the next track just as much as playing the game itself. These are the tracks included in the game:

Pendulum – Self vs. Self, Propane Nightmares (Celldweller Remix)
Celldweller – Switchback, I Can’t Wait
Marilyn Manson – The Beautiful People
Shen Yi – War Dance
POD – Boom
Papa Roach – Last Resort
Blue Stahli – Takedown, Scrape, Ultranumb
Southpaw Swagger – It’s Showtime
Pre-Fight Hype – It’s Goin Down
Voicians – Fighters, The Construct
Rob Zombie – Scum of the Earth
Styles Beyond – Nine Thou
Pre-Fight Hype & Southpaw Swagger – Tug-O-War
enV – Destination, RPM, Vee, Shakestopper, OCP, Bloom

I did however find that there were some instances where no matter how hard I tried to keep to the beat, the enemies attacks didn’t seem to match up to the beat of the track. This wasn’t during every track and it wasn’t consistent throughout any track, so I may have just struggled to keep to the beat.

Other than story mode, KickBeat offers a survival mode, a freeplay mode and a split screen mode.

Title

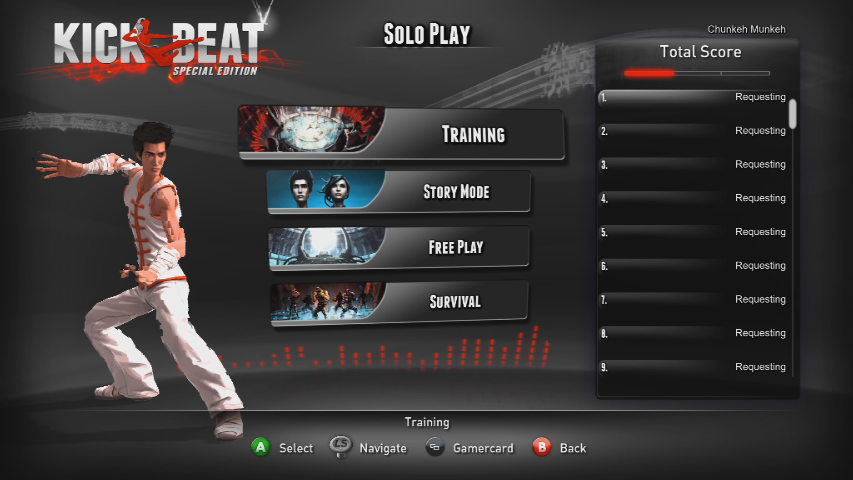
In survival mode, you play through track after track until you lose all of your health. I can’t actually say whether or not your health regenerates after finishing a song because no matter how hard I tried, I was unable to finish the first song and there is no way to alter the difficulty of survival mode.

In freeplay mode, you can make a playlist of any songs you want and just play through them. Nothing fancy, but pretty much every rhythm game has this mode.

The game has four different difficulty levels and if, like me, you aren’t a rhythm guru, I would strongly suggest starting out on Normal difficulty, which is the lowest difficulty. I even found the first two or three songs even on Normal difficulty to be too much. Surprisingly though, things got a lot easier as the story progressed. I think the rhythm was a lot more prominent and easier to follow in the later songs. On the higher difficulties, I really struggled, regardless of the song and I’ve only managed to finish one song on Master difficulty which is the highest difficulty level. The level of difficulty is extremely daunting, especially for newcomers to this genre, but when you do finish a track and you get rewarded with five stars, you get a massive sense of accomplishment, regardless of what difficulty level you are playing on.

With the game being so difficult, you need to make sure you can play it with no distractions. If you cannot hear the music it is near impossible to stay alive, let alone finish with a half decent score. This leads me to my biggest gripe with this game. If you pause it mid track there is no countdown when you unpause it. You might as well restart the track if you have to pause the game because it is pretty much impossible to carry on without a countdown.

Onto the achievements. What can I say? there are at least 14 achievements that will be difficult to near impossible to obtain. The game is no joke. You need to five star all songs on Master difficulty. If you can do that, you have a fighting chance, but it gets even harder. They expect you to only get perfect hits on a Master difficulty song and complete 18 songs in survival mode. Scary stuff for completionists.

All in all, KickBeat is a great Rhythm game with a unique twist. The track list is probably one of the best track lists for a game I have played and although the learning curve is steep and the story is a bit short and repetitive, it is a great buy for $9.99. If you are a completionist, I would stay well away from this one unless you have crazy rhythm skills. I have already resigned this one to forever be incomplete on my tag.

PROS:
1) Amazing track list
2) Challenging for all skill levels
3) Excellent blend of rhythm and fighting game play

CONS:
1) No countdown when unpausing the game
2) Short and repetitive story


7.5
GOOD


Destiny – Weekly Nightfall Guide and Run Through Service

This entry is part [part not set] of 15 in the series Destiny
Schedule

We will be doing Nightfall runs tonight (10/1/14). Exact times and the Twitch feed will be updated later.

Weekly Nightfall Strike

Why do you want to do the Weekly Nightfall Strike? For one, on completion you get Radiant Light until the weekly reset. This give you bonus XP on EVERYTHING you do. This is a 20% bonus that includes Faction and straight up XP, so it really is everything. Second, competition gives you some pretty sweet rewards. Straight up Exotics, Legendaries, 9x Strange Coins, just really nice stuff. The problem is there is no matchmaking and you really need to be level 28 with a good fireteam. Well Bam and I have gotten pretty good at running it and so we are offering a service where we will run through the entire Nightfall event and then invite subscribers right before we finish the final boss. We do the work and you all get the benefits!

Weekly Nightfall Strike Service

Some rules:
1) Only subscribers of GameGuideCentral.com on YouTube will be invited.
Subscribe: https://www.youtube.com/user/savgcom/
2) This is only for people who have not completed the Nightfall this week. You get NO rewards for completing it multiple times so anyone asking for invites after already completing it that week will be banned from later Nightfalls.
3) We will be picking via random number generator. Donations are NOT required but you will get an extra slot for each dollar donated.
4) We don’t have set times for when we will be doing this. Most likely on Tuesday so people get most benefit from the extra XP.
5) You must be Live in Twitch and must be in Destiny and ready to go when your time comes.

Destiny – Iron Banner Event

This entry is part [part not set] of 15 in the series Destiny

destiny_ironbanner

So the dates of the first Iron Banner event are now known. Oct 7th to the 14th. So starting 1 day after the now gutted Queen’s Wrath event ends and running for just 1 week. Iron Banner is a PvP event where level advantage is ENABLED. Meaning bring your best gear and Attack and Defense ratings matter.

As with the Queen’s Wrath event the Iron Banner has it’s own set of bounties to do that add to your Iron Banner rep. Yeah! Yet another Faction to work on!

Rank 1 – 1000 (Unlocks Iron Banner Emblem and Shaders. Emblem and Shader each provide stacking 10% boosts to Iron Banner reputation gains)
Rank 2 – 3000 (Unlocks Iron Banner Class Items. Class Items provide stacking 10% boost to Iron Banner reputation gains)
Rank 3 – UNK (Unlocks Iron Banner Armor Items. Unlocks additional Iron Banner Emblems and Shaders)

WTF?

So this is the graphic on Bungie’s site about the Iron Banner event:
iron_banner_power_bs
So why is it when I play the Iron Banner a level 2 with Green weapons is two shooting me? Any why isn’t my Exotic one hit kill on him? This is so pathetic. Go into PvE against enemies 4 levels lower that you and you DESTROY them, go against 4 levels above and you get DESTROYED. What the F is going on here? Is this seriously how they planned the Iron Banner to be?

Destiny – Xur, Agent of Nine Exotic Stock

This entry is part [part not set] of 15 in the series Destiny
10/31/2014

Hall of Guardians, by Crucible Quartermaster

NOTE: You can purchase Flight of Shadows this week for 1 Strange Coin by having Jackolyte enabled while browsing Xûr’s stock!

The Armamentarium – Titan Chest – 13 Coins

Lucky Raspberry – Chest – Hunter
339 – 439 Defense
Light +21, INT +103
Arcbolt Grenade chains further. Spawn with grenade energy.
Carry more ammo for Heavy Weapons.
Carry more ammo for Fusion Rifles.

Voidfang Vestments – Warlock Chest – 13 Coins

Patience and Time – Sniper Rifle – 17 Coins

10/24/2014

The Armamentarium – Titan Chest – 13 Coins
Crest of Alpha Lupi – Hunter Chest- 13 Coins
Voidfang Vestments – Warlock Chest – 13 Coins
Suros Regime – Auto Rifle – 23 Coins
Exotic Gloves Engram – 23 Motes of Light

10/17/2014

Xur is located on the balcony when walking to Dead Orbit / FWC

The Armamentarium – Chest – Titan

Achlyophage Symbiote – Helmet – Hunter
311 – 402 Defense
Light +21, DIS +95
Increased grenade throw distance.
Golden Gun gains one additional shot per use.
More Super energy from Grenade kills.

Light Beyond Nemesis – Helmet – Warlock

Truth – Rocket Launcher – 17 Coins

Exotic Chest Engram – 23 Motes of Light

10/10/2014


Xur is by the Speaker.

Helm of Inmost Light – Helmet – Titan
311 – 402 Defense
Light +18, STR +76
Reduce melee cooldown when you pick up an Orb.
Provides Death from Above and Headstrong for Fist of Havoc.
Increased melee attack speed.

Lucky Raspberry – Chest – Hunter
339 – 439 Defense
Light +21, INT +103
Arcbolt Grenade chains further. Spawn with grenade energy.
Carry more ammo for Heavy Weapons.
Carry more ammo for Fusion Rifles.

Voidfang Vestments – Chest – Warlock

Ice Breaker (Sniper Rifle) – 17 Strange Coins

Exotic Helmet Engram – 23 Motes of Light

10/3/2014

Helm of Saint-14 – Helmet – Titan
311 – 402 Defense
Light +21, INT +89
Increased melee attack speed.
More Super energy from non-Guardian kills.
Ward of Dawn blinds enemies who enter it.

Achlyophage Symbiote – Helmet – Hunter
311 – 402 Defense
Light +21, DIS +95
Increased grenade throw distance.
Golden Gun gains one additional shot per use.
More Super energy from Grenade kills.

Sunbreakers – Gauntlets – Warlock
254 – 329 Defense
Light +21, INT +77
Increases the duration of your Solar Grenade.
Increased reload speed with Special Weapons.
Melee hits replenish Grenade energy.

Red Death – Pulse Rifle
260 – 300 Attack
Each kill heals you and speeds up reloads.
It’s easier to aim under fire using this weapon.

9/26/2014

Crest of Alpha Lupi – Chest – Titan
339 – 439 Defense
Light +21, INT +130
Revive teammates faster. Spawn more orbs.
Carry more ammo for Special Weapons.
Carry more ammo for Auto Rifles.

Knucklehead Radar – Helmet – Hunter
311 – 402 Defense
Light +21, STR +95
Grenade hits restore melee energy.
More Super energy from non-Guardian kills.
Radar remains visible while aiming Primary Weapons

Apotheosis Veil – Helmet – Warlock
311 – 402 Defense
Light +21, DIS +97
Melee hits replenish Grenade energy.
Replenish health when you pick up an Orb.
Activating your Super regenerates your health.

Suros Regime – Auto Rifle
260 – 300 Attack
The bottom half of each magazine deals bonus damage and has a chance to return health when dealing damage.
When zoomed, this weapon fires slower, but causes additional damage.

9/19/2014

Helm of Inmost Light – Helmet – Titan
311 – 402 Defense
Light +18, STR +76
Reduce melee cooldown when you pick up an Orb.
Provides Death from Above and Headstrong for Fist of Havoc.
Increased melee attack speed.

Lucky Raspberry – Chest – Hunter
339 – 439 Defense
Light +21, INT +103
Arcbolt Grenade chains further. Spawn with grenade energy.
Carry more ammo for Heavy Weapons.
Carry more ammo for Fusion Rifles.

Sunbreakers – Gauntlets – Warlock
254 – 329 Defense
Light +21, INT +90
Increases the duration of your Solar Grenade.
Increased reload speed with Special Weapons.
Melee hits replenish Grenade energy.

Gjallarhorn – Heavy – Rocket Launcher
260 – 300 Solar
Rounds fired from this weapon split into tracking cluster missiles upon detonation.
Shells fire from this weapon track their targets.

9/12/2014

No Back Up Plans
Mask of The Third Man

Sunbreakers – Gauntlets – Warlock
254 – 329 Defense
Light +21, INT +90
Increases the duration of your Solar Grenade.
Increased reload speed with Special Weapons.
Melee hits replenish Grenade energy.

Red Death – Pulse Rifle
260 – 300 Attack
Each kill heals you and speeds up reloads.
It’s easier to aim under fire using this weapon.

Destiny: Patch Notes Analysis

This entry is part [part not set] of 15 in the series Destiny
Destiny – Update 1.0.2.3. – Patch Notes – 10/28/2014

Summary
This update makes Destiny a more stable experience for all players. We’re also changing the player experience in the Raid to ensure that the activity provides an endgame challenge that meets project goals for the intended level of difficulty.

General
Fixed an issue in which multiple errors reported with Zebra error codes
Errors previously reporting as Zebra will now display as their own separate codes
Fixed a rare issue related to being Kicked To Login repeatedly
Fixed a rare issue that resulted in a Kick To Orbit reported with the Cockatoo error code

Servers
Fixed an issue where some players would occasionally be erroneously kicked at the beginning of an activity due to a server error
Increased protection against account corruption

Raid
Fixed an issue where Atheon was not choosing random targets for teleport through the timestream during the final encounter on the Vault of Glass

-Swaggers’ Thoughts

To me this just seems like a straight up lie. There is no way that this section was supposed to be random and for a whole f-ing month it was the back three and they didn’t say a word. This is the same old BS where Bungie says, “Play the game your way”, but secretly that means only if your way is the exact 100% way we think you should play it. Throws strategy right out the window in a pathetic attempt to just make the damn thing harder for no reason what so ever.

Fixed an exploit where Atheon could be forced off his platform

More updates are to follow as we continue to support Destiny. Future enhancements being worked on include Exotic Weapon tuning, new features for voice communication between matchmade teammates, and the ability to hold more Bounties in your pocket at any time.

Destiny – Patch 1.0.1.5 (Hot Fix) and Dev Notes – 9/25/2014

OK. This is a really disappointing patch / dev notes. I am going to insert some comments along the way with my feeling.
Activities

Missions
Reduced drop rate of engrams following a hard wipe [fixed in 1.0.1.4]

-Swaggers’ Thoughts

I guess I don’t even know what they are saying here. Does this refer to the Moon farming where you kill almost all the enemies and die? So now after a wipe you get even LESS drops?

Queen’s Wrath Event
Material rewards for dismantling Queen’s Wrath gear will no longer provide ascendant materials, but missions will continue to drop Legendary items

This is a completely stupid move. The “Event” is completely and totally worthless for anyone over 24. It was already a retarded grind to do a bounty for a worthless faction just to get a ticket to get the exact same 2 items. The only reason to do any of this was for the Shards. Event is dead to me now.

World

Destinations
The Hive of the holy “Treasure Cave” have realized the futility of their endless assault on Skywatch and have retired to lick their wounds and plan their next attack.
Respawn timers for monster caves in Skywatch have been normalized to 40 seconds (increased from 6)
Respawn timers for monster caves in Forgotten Shore have been normalized to 40 seconds (increased from 10)
Respawn timers for monster caves in Ember Caves have been normalized to 40 seconds (increased from 10)
Respawn timers for monster caves in the Shattered Coast have been normalized to 40 seconds (increased from 10)
Respawn timers for monster caves in the Barrens have been normalized to 40 seconds (increased from 20)

-Swaggers’ Thoughts

I’m ok with this. Sucks for people who didn’t get to abuse it but really all my good pieces have come from other activities. The game is already an insanely stupid grind and all they are doing is dragging it out even further. All this smacks of desperation to keep people playing but then they have weekly limits on rewards. They seem to be hell bent on slow progress but hardcore players have already gotten to level 30 and the Raid have been completed in just 37 minutes less an a week after it came out.

Dev Notes

Loot

He Who Shall Not Be Named
Long ago during development, the Cryptarch decoded engrams of a given color into gear of that same color. Early in 2014 we added randomness, both for better and worse, to the decrypting process. The result was that end-of-session engram decoding got a lot more exciting and the Cryptarch himself suddenly acquired a personality. Both of these experiences were positive additions to the game.

But we didn’t adequately communicate the potential random outcomes of decryption. Players see what looks like the familiar metaphor of item identification, while the Cryptarch thinks he’s opening a grab bag of loot. Rage sharding of blues ensues. Expect to see changes to address this soon.

-Swaggers’ Thoughts

Loot drops are already rare enough and to get a Uncommon, or even worse, a Rare or Legendary for another class is absurd. This game is grind grind grind and there isn’t enough content to keep it from getting stale really fast.

Destiny: The Cave
The social experience of a cave farming run is amazing: the herding to get a team of Guardians all behind the line and firing in the right direction, the rush to grab the loot, the scramble when the panic wave starts, the beckoning glow from inside the cave. The speed at which the community organized around this activity was inspiring and humbling to us.

But shooting at a black hole for hours on end isn’t our dream for how Destiny is played. Our hope is that social engagement in public spaces is only one part of the Destiny experience. Expect changes soon which decrease the efficiency of cave farming and correspondingly increase engram drops from completing activities.

As I said in the patch notes this one I understand. I would bet money that nerfs comes before pluses though. Plus patrol is a activity and running from cave to cave while killing all the enemies seems completely in scope. Why would I run a Strike for 20 minutes to get complete CRAP? They need to VASTLY improve loot from strikes and missions if they want me to run those non-stop instead. I don’t understand why they hate caves but grinding strike is still grinding so who cares?

Reward Celebration
Growing more powerful by acquiring new upgrades, gear or progression is central to Destiny’s player experience. Our goal is to always celebrate when this occurs, both as a reward in and of itself and to communicate to players what is going on.

During development we sometimes prioritized making a system functional over celebrating its rewards, for example:
The Vault of Glass contains highly coveted loot but the actual moment of reward happens without fanfare and can be easily missed.
The lowest level of the Daily Heroic gives great XP and Reputation rewards, but neither of these progressions appears on the postgame screen.

We will slowly be addressing these and other issues going forward.

Social

Voice Communication
Our vision for Destiny is that all players, even matchmade players in the Crucible, Strikes, the Tower or public spaces, be able to communicate with one another in a way that promotes positive socialization. Voice communication is the easy answer, but existing voice paradigms, including those in our own Halo games, have not done enough to protect players from abusive griefing from a minority of players.

Destiny’s near-term solution will be to allow players to opt-in to voice communication during matchmade activities. Work on this feature was underway at launch and should be rolled out this year in Strikes and the Crucible.

-Swaggers’ Thoughts

No voice because some kids don’t like to be yelled at? Are you kidding me? Dumbest answer I have ever heard as to why there is no voice in a “SOCIAL” game.

Activities

Strikes
Strikes are intended to be a fun, combat-filled romp and stomp with a big boss and cool rewards at the end. Better with cooperation, but doable in a pick up group.

Since launch we’ve tracked down an issue which has made Strikes more challenging than originally designed by both increasing damage taken by players and decreasing the damage inflicted by players on the boss. Expect to see this addressed soon, and for Strikes to become a little less grindy as a result (sorry, Raiders – incoming damage is working as intended in the Vault of Glass).

-Swaggers’ Thoughts

There are only 4 strikes so creating any type of playlist is going to make them BORING and GRINDY. Add the random BS nature of rewards and it’s doubly bad.

Balance
Our goal when balancing Destiny is to never have one player choice– for example a choice of class or weapon– either be so much better than the alternatives that it is the only valid choice or to be so much worse that it would always be a mistake to choose. When we are successful with this kind of balance the result is a wide set of equally compelling player builds, some of which may be preferred by one player or another but none of which is an absolute right or wrong choice.

Exotic Weapons
Exotic Weapons are designed to look, feel and sound overpowered, but to not actually break the game. We hope these weapons challenge the way players think about their loadouts and expect their idiosyncrasies to sometimes be a little frustrating. We find ourselves wanting to collect them all and hope players feel the same way.

Not all our Exotic Weapons currently live up to this promise. In particular those weapons received from completing exotic bounties including Thorn and Bad Juju have disappointed many of us who have gone through the great effort to obtain them because, despite looking and sounding amazing, they feel underpowered. We’re here to offer some advice: don’t shard those guns. Their time will come.

-Swaggers’ Thoughts

Yeah. All that time and effort to get the Thorn and it kicks like a mule and takes 2 head or 3 standard shots to kill while someone with a Auto Rifle just hits dead target every shot. Worthless. Interested to see how long this change takes to see in game.

Auto Rifles
The Auto Rifle archetype is designed to appeal to players who like to throw up a wall of bullets and not worry if a few miss their target. It is intended to inflict sustained damage at close to medium range, but to lose effectiveness at longer ranges.

Today the Auto Rifle is too effective at long range, even beating Scout and Pulse Rifles in some circumstances. Expect stability and/or damage adjustments to the Auto Rifle to address this in the weeks ahead.

-Swaggers’ Thoughts

In “SOME CIRCUMSTANCES”? What are those? Where the user of the Auto Rifle is good awful at PvP? And then probably only 50% of the time.

Scout Rifles
Scout Rifles are for players who like to keep their enemies at medium range and hate to miss. They are intended to be an awkward weapon to use at close range but to be dominant– as long as you land your shots– at medium and longer ranges.

Scouts just aren’t hitting hard enough today when compared to other precision weapons. We’ll be addressing this soon.

Shotguns
Shotguns are for those situations where you need to deliver a massive spike of damage, right now, to the thing standing next to you about to do you harm.

Today shotguns are effective beyond their intended range, especially when upgraded with that intention. Expect changes soon to address shotguns which push the envelope of what it means to be close quarters.

Thank you for helping us drive these changes. Keep sharing. Keep talking. We’re watching and listening.

–Bungie

-Swaggers’ Thoughts

Just overall this is complete BS talk. Everything that helped players (Loot Cave and Queen Shards) is immediately destroyed via Hot Fix. Anything that they are talking about doing to help players is some time in the future and possibly up to a month or two.

Destiny – Patch 1.0.2 Pre-Release Notes

Cryptarch Changes 
Cayde-6 took the Cryptarch aside and showed him a sack of doorknobs. He decoded that mystery pretty quickly.
Legendary Engrams will always produce Legendary or better quality items, including Materials or Exotics
Rare Engrams will always produce Rare or better quality items
Rare engrams will have an increased chance to produce Legendary quality items

Activity Changes
Daily Heroics, Weekly Heroics, and Vanguard: Tiger Playlist activities will include Rare and Legendary Engrams in addition to their existing rewards

Item Changes
Ascendant materials have been promoted to Legendary to closer associate them with the gear they are used to upgrade
Legendary Engram items that exist in your inventory will be demoted to Rare quality when the patch goes live, so decode them while you can. But let’s be honest–even if you don’t, we all know they were blues already…

-Swaggers’ Thoughts

YES YES YES YES YES YES YES YES YES YES. I actually wanted to copy paste that a bout a BILLION more times. Perfect. How it should of been to begin with but amazing change. Can’t wait to see how Engrams are added to Activities.

Achievement Guide: Defense Grid 2

The majority of the achievements in Defense Grid 2 are very simple and progression based. Meaning you just unlock them in time like kill 100 aliens and beating the story.

Alien Tears – 10gs – Earn a gold medal on every mission in Story mode.
Annihilator – 10gs – Kill 10,000 aliens.

Play-through the campaign and you will be well on you way. Either way, just play the game and in time you will unlock it.

Arsenal – 10gs – Build 20 towers of any type in one mission.

Play the first level of the game, or any level with at least 20 pieces to drop towers, and drop all guns or boosts in the 20 locations to unlock the achievement.

Base Defender – 100gs – Complete the single player campaign in Story Mode.

Complete all the levels in story mode. Simply play through and beat each level.

Boot Camp – 10gs – Finish all the missions in Chapter 1 in Story Mode.

There are just three levels in the first chapter. Play all three of them and you will unlock it.

Brothers In Arms – 10gs – Earn a Bronze (or better) medal in a Coordinated Defense Multiplayer mission.

Play a mission in coordinated defense mode and complete a level with at least a bronze. By beating the level you will get the achievement because you will automatically get at-least a bronze.

Burn Baby Burn – 10gs – Build 100 Inferno towers.

Inferno towers shoot out flame throwers towards the aliens. Build a total of 100 to get the achievement.

Close Call – 10gs – Save a core that is less than 10 seconds away from the map’s exit point.

When an alien makes it to your base, he tries to escape back out of the map with a core piece. Kill the alien and the core will return to the base. If you kill the alien within 10 second of him escaping you’ll get the achievement.

Confident – 10gs – Use the speed up control at 3x for a total of 60 seconds in any mission.

Press RB to fast forward the level. Keep it fast-forwarded for 60 seconds.

Death From Above – 10gs – Use the Orbital Laser Special Weapon (General Cai).
Diversity – 10gs – Build at least 1 of each tower type in any single mission.
Eradicator – 10gs – Kill 100 aliens.

Kill 100 aliens, you will get this achievement at the end of the first level.

Exterminator – 10gs – Kill 1000 aliens.

Kill 1000 aliens, you will get this after playing 5+ levels.

Field Promotion – 10gs – Earn a silver (or better) medal.
Filthy Rich – 30gs – Win a mission with at least 10,000 resources remaining.
Firebug – 10gs – Using only Inferno towers, Win any Chapter 4 (or later) mission.
First Blood – 10gs – Kill 1 alien.

Seriously?

Flawless Victory – 10gs – Earn a Gold Medal.

Don’t let a single alien take a core piece back for a whole level. Just play level one and block and upgrade the towers.

Full Defense – 10gs – Build 50 towers of any type in one mission.
Full House – 10gs – Build and fully upgrade each tower type in one mission.
Full Potential – 10gs – Win a chapter 4 (or later) mission with level 3 towers only and no selling.
Go Team! – 10gs – Earn a Gold medal in a Coordinated Defense Multiplayer Mission.
Go To Your Home – 10gs – Use the Core Teleport special weapon (Professor Taylor).
Great Ball of Fire – 10gs – Build 100 Meteor towers.
Gun Crazy – 30gs – Using only Gun towers, Win any chapter 4 (or later) mission.
Happy Returns – 10gs – Recover a loose core.
Head Trauma – 10gs – Build 100 Concussion towers.
Hey! That’s mine! – 10gs – Kill an alien carrying a power core.
High Voltage – 10gs – Build 100 Tesla towers.

Build a total of 100 Tesla towers.

If At First You Don’t Succeed, Retry Again – 10gs – Use the reload checkpoint option five times in a single mission.
Indecisive – 10gs – Sell 10 towers or more in a single mission.

After building a tower, you can sell them away for a small amount of resource and to free up space. Do this 10 times in a single mission.

Kaboom! – 10gs – Build 100 Cannon towers.

Build a total of 100 Cannon towers.

Leadhead – 10gs – Build 100 Gun towers.

Build a total of 100 Gun tower.

Liquidator – 10gs – Sell 10 towers.

After building a tower, you can sell them away for a small amount of resource and to free up space. Do this 10 times.

Master Builder – 10gs – Use the command shuttle to move 6 map sections in Mission 6.
Master Strategist – 100gs – Earn 100 Gold Medals on any missions.
Minimalist – 10gs – Using only level 1 towers, Win any Chapter 4 (or later) mission.
More Please – 10gs – Use the Resource Reinforcement Special Weapon (Professor Briel).
No Fast Blast – 10gs – Use the Temporal Cannon Special Weapon (Colonel Rissler).
No Sale – 10gs – Win any mission without selling any towers.

This is easiest to do in level 1. Simply place a tower that blocks the one path, making the alien trip much longer. And place towers surrounding the path for the aliens and take them all out without ever selling a tower.

Not So Fast – 10gs – Build 100 Temporal towers.

Build a total of 100 Temporal towers.

Now With Sprinkles – 10gs – Enable a Tower Augmentation item on any tower.
Penny Pincher – 10gs – Win a mission with at least 5,000 resources remaining.
Pew Pew – 10gs – Build 100 Laser towers.
Planet Defender – 30gs – Earn a silver medal (or better) on all missions in the Story mode.
Pumped Up Towers – 10gs – Use the Tower Overcharge Special Weapon (Advisor Zacara).
Retry – 5gs – Use the Reload Checkpoint option.
Salvage Rights – 10gs – Kill an alien boss creature. (Juggernaut, Rumbler, Turtle, or Crasher)
Shell-shocked – 10gs – Using only Cannon towers, Win any Chapter 4 (or later) mission.
Shoot That Guy – 10gs – Use the Precision Targeting Special Weapon (Rear Admiral Phillips).
Surplus – 10gs – Win a mission with at least 1,000 resources remaining.
10 Items No less – 10gs – Enable a Tower Augmentation Item on 10 Towers.
Thanks for Playing! – 5gs – Earn a Bronze (or better) medal in a Single Player Mission.
The Not-So-Friendly Skies – 10gs – Build 100 Missile towers.
The Path Most Traveled – 10gs – Win a Gold medal on Mission 19 without using the Command Shuttle.
Tower Expert – 10gs – Build every tower and every upgrade for each tower.
Warning Shots – 10gs – Play a DG Fighter Multiplayer mission.
What IS that? – 10gs – Inspect 10 aliens.
Winning Shots – 10gs – Earn a Victory in a DG FighterMultiplayer mission.
Would you like a boost with that? – 5gs – Build 100 Boost towers.
Xenocide – 30gs – Kill 50,000 aliens.
Yellow Beats Green – 5gs – Upgrade a level 1 tower to a level 2 tower.
Master Siege Breaker – 55gs – Survive 100 waves on any Super Grinder challenge mode.
Siege Breaker – 55gs – Survive 100 waves on Grinder challenge mode on any mission.
Untouchable – 30gs – Beat a Chapter 4 mission or higher with zero cores captured.

Destiny – Queen’s Wrath Event

This entry is part [part not set] of 15 in the series Destiny

queens-emissary

Scheduled dates are 9/23 through 10/6.

The Queen’s Emissary, Petra Venj, is in the Event area straight ahead when you get to the tower. The Queen represents a new faction called simply Queen’s Wrath. Getting to level 1 will requires you to get 1000 reputation. Reputation is earned by completing bounties which are given by the Bounty Tracker. These do not replace your standard Vanguard or Crucible bounties but are represented as a new series of 5. They have the same 24 hour timer as the other bounties so you can only do 5 Queen’s Wrath bounties per day. Every time you successfully complete a bounty you will get a Queen’s Order mission reward.

NOTE: Wearing the Queen’s Shader, Emblem and/or Class Specific Item grant bonus Faction when you turn in bounties!

Rank 1 – 1000
Rank 2 – 3000
Rank 3 – UNK (Earning Rank 3 adds new weapons options to purchase)

Each Queen’s Order Ticket allows you to do one Kill Order mission. Kill Order missions appear at the top of the line on the left side of your orbit screen when selecting a destination. These are standard missions but are rated a level 24. The easiest to do is the Earth mission Restoration. If you get a mission you don’t want to do just go to orbit. You only spend the ticket on completion. Completing these Kill Order missions awards ZERO rep but give a Queen specific Legendary Armor piece. The Tickets are turned in after winning a mission and as soon as it tells you that you have earned your Legendary you can safely go to Orbit and skip any cutscenes at the end. If you have a ticket, you get a Legendary. Anyone can join you but only players with Tickets get a Legendary.

UPDATE 9/25/2014 = Patch 1.0.1.5 – Removed getting Ascendant Shards from dismantling!
Even if you don’t like the gear it’s worth doing the Kill Order missions just to dismantle the Legendaries as that is guaranteed Ascendant Shards.

TITAN ARMOR:
Queen’s Guard Plate (Legendary) – 306-406 Defense, Light +18, Int +59, Str +65, Carry more ammo for Fusion Rifles & Scout Rifles
Queen’s Guard Helm (Legendary) – 280-372 Defense, Light +18, Int +48, Str +51, Grenade hits restore melee energy & Reduce melee cooldown when you pick up an Orb

HUNTER ARMOR:
Queen’s Guard Vest (Legendary) – 306-406 Defense, Light +18, Dis +64, Str +60, Carry more ammo for Sniper Rifle, Scout Rifle
Queen’s Guard Mask (Legendary) – 280-372 Defense, Light +18, Int +47, Str +47, Increased melee attack speed & Replenish health when you pick up an Orb.

WEAPONS:
The Supremacy – Sniper Rifle (Legendary) –

DISTRIBUTION:
Titan #1 – 4x Helm
Titan #2 – 2x Chest, 2x Helm
Hunter #1 – 1x Chest, 1x Helm

With only 2 weeks and not knowing what levels 2 and 3 are reputation wise this could be a hard faction to level up. Doing all the bounties the first day will get you to halfway to Rank 1 with 500 reputation.

Shader – Rosegold – Rank 1
Shader – Prism Dancer – Rank 3
Emblem – Queen’s Guard Crest – Rank 1
Emblem – Crown of the Sovereign – Rank 3
Class Armor – Mark of the Queen’s Guard (Titan) – Rank 2
Auto Rifle – Her Right Hand – Rank 2
Scout Rifle – Vesta Noblese – Rank 2
Hand Cannon – Merciless – Rank 2

BOUNTYDESCRIPTIONTYPE
By Thy HandDefeat 20 Guardians with Hand Cannon headshotsCrucible
Her Willful GazeDefeat 20 Guardians with Scout Rifle headshotsCrucible
Off With Their HeadsDefeat 20 Guardians with Sniper Rifle headshotsCrucible
For Her HonorWin 3 Crucible Matches with the Queen's Class, Emblem and Shader items equippedCrucible
Warrior of the ReedDefeat 50 Guardians with the Queen's Class, Emblem and Shader items equippedCrucible
Extermination ProtocolDefeat 200 Fallen with headshotsPatrol
Face Your FearsDefeat 3 Fallen WalkersPatrol
No ParleyDefeat 10 Fallen MajorsPatrol
Relic Harvest - FallenCollect 200 Ether Drops from Fallen Enemies on any planetPatrol
Prime TargetDefeat Sepkis Prine, deep within the Cosmodrome on Earth (The Devils' Lair)Strike
A Perfect StrikeComplete a level 26 Vanguard Strike without dyingStrike
A Perfect StrikeComplete a level 28 playlist Strike without dyingStrike
Archon SlayerDefeat Riksis, the Devil Archon, in the Cosmodrome on Earth (Restoration)Story
Last Day of WinterDefeat Draksis, Winter Kell, in the Scourge of Winter on Venus (Scourge of Winter)Story

There are also Bounties for the first two expansions, The Dark Below & House of Wolves, so this event will come back.

Destiny – Vault of Glass Raid Guide

This entry is part [part not set] of 15 in the series Destiny
Step 1 – Entrance

Need to activate and hold 3 “Sync Plates” from L 26 Praetorians so that “The Spire is forming” completes opening the vault. When you complete it you will get a “The Spire has been activated” message.

Step 2 – The Trial of Kabr

You will get a chest at the end of the cave system.

Step 3 – Templar’s Well – Defend the Confux

Starts with a large jumping parkour section. When you get to main area you just need to eliminate enemies. L 25 Fanatics spew green goo on death that needs to be cleaned in the one cleansing pool in center area if you get hit.

Step 4 – Templar’s Well – Defend the Left and Right Conflux

Split into 2 teams and you need to defend a construct from the Vex coming and sacrificing themselves. As the Vex succeed you will see “A Vex has sacrificed itself to the Right/Left Conflux”. Kill enough Vex to completed the section.

Step 5 – Templar’s Well – Destroy The Oracles

There are a total of 6 possible spawn points, 3 per side. You need to destroy the Oracles as they spawn. They appear as green glowing orbs. If you get “Marked by Oracle” you need to jump into the middle cleanse to clear it. You will earn a reward for finishing this section.

Step 6 – Templar’s Well – Kill The Templar

Someone must get the Relic. The Relic’s super removes The Templar’s shield, this locks everyone, destroy the bubble and attack The Templar. The Relic’s grenade will cleanse Guardians of Oracle marks. One person needs to get into the red telportation circle when they appear to stop Templar from re-shielding, it will turn white when you’ve cleared the circle and you can look for the next one. Templar will get “ENRAGED” causing temporary difficulty increase. Watch for “The Templar calls for its Minotaurs” also. Finishing this section will give you a reward.

Step 7 – The Gorgons’ Labyrinth

Right before starting this section double jump your way up the left side mountain to a hole and follow that some ways to a chamber with a chest. If anyone is spotted your get the “Gorgon’s Gaze” and then “A Gorgon has found its prey” and the entire Fireteam dies.

Step 8 – Vault of Glass

This is another platforming section where the platforms quickly spawn in and out and you need to be ready to go to the next one immediately.

Step 10 – Vault of Glass – Awaken the Glass Throne

First off eliminate the Gatekeeper. From the entrance you then need to activate the Timegate by capturing the Sync Plate on the right. You’ll see “A Vex Timegate is active”. 2 or so Guardians enter the Time Gate and kill the Descendant Gatekeeper and then grab the Relic. Everyone inside will be “Marked by the Void” and will have their screen slowly go blind until Cleansed by the Relic. When the Guardian who has acquired the Relic comes out a central section will activate and Minotaurs will spawn at the far top end trying to sacrifice themselves to the pillar, someone needs to stop this at all costs. The second (left) side portal must be activated and the Relic carrier needs to enter the Timegate and kill the Precusor Gatekeeper inside. A second Relic needs to be picked up and everyone needs to go back through the portal to the main area. Then wipe out the remain Minotaurs.

Step 10 – Vault of Glass – Destroy Atheon

Atheon, Time’s Conflux – Atheon will teleport the farthest Guardians to a portal area (“Atheon opens the timestream”) and the other Guardians will need to open the portal, defend it, and help the teleported team get out. Inside the portal areas all of the Oracles need to be killed. Once all the Oracles are dead the Guardian with the Relic will have Time’s Vengeance active for :30 which gives your whole team a damage buff. Keep cycling through the portals until you destroy Atheon.

Possible Final Rewards:
Chatterwhite – Shader
Atheon’s Epilogue – Auto Rifle (Bonus damage to Oracles)
“Glass Minuet” – Ship
Vision of Confluence – Scout Rifle (Bonus damage to Oracles)

Destiny – Exotic Bounty Guides

This entry is part [part not set] of 15 in the series Destiny

These appear to be random. I would assume that you need to get at least to 20 and possibly to an even higher Light level to get one to spawn. I got one once I reached Crucible rank 2 (3,500 total rep). [I’ve now gotten 4 Exotic Bounties and Bam has gotten 2. It’s completely 100% random] When you do get the trigger the Bounty Tracker will offer you 3 Gold Bounties with somewhat obscure descriptions. These bounties are for Exotic Weapons and are really quests with multiple parts to receive your reward. As we find and do these we will be creating guides to help you unlock them.

JUMP RIGHT TO THE GUIDE YOU ARE INTERESTED IN

Shattered Memory Fragment – Pocket Infinity – Fusion Rifle
A Dubious Task – Invective – Shotgun
A Light In The Dark – Thorn – Hand Cannon
A Voice In The Wilderness – Super Good Advice – Machine Gun
Toland’s Legacy – Bad Juju – Pulse Rifle


Shattered Memory Fragment – Exotic Weapon Bounty (Pocket Infinity – Fusion Rifle)


Track down Fireteam Tuyet’s last stand.
Destination: Venus – Patrol
Head to the city area from the first few missions on Venus. Just past the large statue is a small building on the left. Enter and on the left will be Dead Ghost you need to scan.

DAMAGED GHOST – Kill a Vex Gate Lord with the Heroic modifier active.
Destination: Venus – Eye of a Gate Lord (Mission)
You need to complete this mission with the Heroic modifier which means you need to do it on level 17 or above. Then simply complete the mission by killing the Vex Gate Lord at the end.

RESTORED GHOST – Bring the Unlocked Ghost to the Speaker in the Tower.
Destination: Tower
Pretty easy step. Just go to the Speaker to continue.

FUSION RIFLE SCHEMATICS – Bring the Fusion Rifle schematics to the Gunsmith.
Destination: Tower
Now just take it to the Gunsmith.

DEPLETED EXOTIC WEAPON CORE – Charge the Core by dismantling 10 Rare or higher quality Fusion Rifles
Destination: Loot Farming
So if you get really really lucky the Gunsmith will be selling Rare Fusion Rifles. I have seen him selling rares but not Fusions Rifles yet so I don’t know if you can buy just one or as many as you want. You can check the Bungie.net website and under Tower select the Gunsmith to see what he is currently selling. It refreshed every 3 hours. Your most expensive option is to buy Fusion Rifles from the Crucible or Vanguard Quartermasters. You need to be Faction 3 and they will cost you 150 Marks. Other than that you will need to get Secondary Weapon Engrams and hope they become Fusion Rifles of Rare or Legendary status. Check out our Farming Guide HERE for locations you can try to farm Rare Engrams and just hope for the best. Of course anything that has a possibility of Engrams will work so you can play Crucible or Strikes or whatever your heart desires as long as you end up Dismantling 10 Fusion Rifles at the end. The Bounty does have a tracker so you can check your progress.

CHARGED EXOTIC WEAPON CORE – Bring the Charged Core to the Gunsmith.
Destination: Tower
Now just take it to the Gunsmith.

UNSTABLE PROTOTYPE FUSION FRAME – Kill enemies in a Weekly Nightfall Strike until the Fusion Rifle stabilizes.
Destination: Weekly Strike Mission
You need to be high level to even be allowed to try Nightfall Strikes and they are level 28. You need to get 200 kills within these Strikes to finish this section. Nightfall is if your party dies you have to start the entire thing over. Take note that you need to use Fusion Rifles for the kills to count. The kills do not start counting until you get into the darkness area. The low level enemies outside of the actual strike area do not count but once you are fighting level 28s all of these kills count. Only your kills count for this one but you’ll want a full team to help out. If you want to bust this out solo I would suggest a LOT of Special Ammo Synthesis. Make sure you just bypass any opening area low level mobs as these don’t count towards your total.

My Summoning Pit Run:
Sparrow until I get past the 3 opening Knights and into the Strike proper. In the first real area you can still respawn. You want to immediately kill the two Thralls that are just sitting there when you get into the area. Then I bum rush the 3 Acolytes and try to one shot them point blank. If I can move on to next then fine, if I die then I bum rush the next. When these 5 enemies are dead I hug the left ledge and rush to the first REAL area. Here set your Ghost and then turn towards the room and jump to the left platform. Thralls will rush you from the door in front of you and this is where you get your kills. When the Knights show up I try to clean up any Thralls left lingering and then let the Knights kill me to restart. Get about 20 a run.

STABILIZED PROTOTYPE – Return the Prototype to the Gunsmith
Destination: Tower
Turn this in to the Gunsmith and you get your Pocket Infinity!

Pocket_Infinity


A Dubious Task – Exotic Weapon Bounty (Invective – Shotgun)


A Dubious Task is the Exotic Weapon Bounty that will allow you to unlock the Exotic Shotgun, the “Invective”. This is my personal first exotic bounty(This is Bam BTW) so I’m gonna show you step by step how I unlocked it and what you need to do. As I was turning in some bounties to Xander 99-40 I was thrilled when I saw that I had luckily got a chance to do an Exotic Weapon Bounty. It’s all luck really, just keep turning in bounties and eventually hopefully you’ll get one.

Talk to Ikora Rey.
Destination: Tower
For our first step we simply need to go to Ikora Rey to get PART I of our bounty. She is the Warlock Vanguard, found in the Hall of Guardians in the Tower. Simply talk to her and accept first part of the bounty.

A REQUEST FROM IKORA PART I – Complete a total of 5 Strikes without dying.
Destination: Earth (Strike Mission Devil’s Lair)
This seems like it would difficult, but it’s not hard at all, just time consuming. Go to Earth and select the strike mission, Devil’s Lair. Beat it five times without dying to complete this step. This does not have to be consecutive.
There are three different section of the strike. One tasks you with defeating waves of enemies, the next asks you to beat a giant robot spider and last you need to beat Sepris Prime, who is a giant purple mechanical eyeball. The main thing you have to do is not get cocky. Don’t attack everything and everyone with reckless abandon. Take your time, watch your health, and just get it done. The picture below will show you three very important spots to stay safe and not get killed.

For the first section, stay up on the catwalk and stay to the far right. For the second section, stay all the way back behind this tractor trailer and stand on the hood. For the last section, stay back and to the left by the stairway.

For the first section, stay up on the catwalk and stay to the far right — For the second section, stay all the way back behind this tractor trailer and stand on the hood — For the last section, stay back and to the left by the stairway

A REQUEST FROM IKORA – COMPLETED – Bring the completed request to Ikora
Destination: Tower

A REQUEST FROM IKORA PART II – Earn a Kills\Death spread of 25 in the Crucible
Destination: Crucible
Now you must head back to Ikora in the Hall of Guardians to turn on PART I and get PART II. The next part of the bounty asks you to get a 25 KD spread in Crucible! That’s some Cruci-bull-shit!!!! Now at first I thought, as well as a lot of the internet, that you needed to get 25 kills and 0 or 1 death. Thankfully this is not the case. It’s not a 25 kill death ratio, it’s a 25 kill death spread. Meaning you need to get 25 more kills than deaths. So that could mean going 40 kills and 15 deaths or 50 and 25 or even if it took you forever you could go 500 and 475. It’s over as many games as it takes. For me it took just two matches. After the first game, that I joined late, I was at 6 out of the 25. Then I played the next match and I kept checking the bounty to see that it was moving up and up until I got the 25. As soon as you obtain the 25 kill death spread you are done. It will tell you in game and even on the kill feed so anyone and everyone can see that you finished that step. After you get the 25 kill death spread you can even die a bunch and it still won’t change anything. When you get it you get it. Once your match is done head back to the tower and talk to Ikora again.

A REQUEST FROM IKORA – COMPLETED – Bring the completed request to Ikora
Destination: Tower

A REQUEST FROM IKORA – PART II – Complete a Weekly Challenge Acivity
Destination: The Standard Weekly or Nightfall Strike Mission
Once you talk to Ikora again you will be tasked with completing one of the weekly challenges, strikes. Each week Bungie resets the weekly strike mission for all of us to do. For me, this weekly challenge was the Strike on the moon. Just pick the easiest level possible, it usually starts at 22. You can go it along, but it’s probably smarter to take a fire team with you. As soon as you’ve beaten it you will see that you’ve finished that step in the bounty, your bounty now also looks completely with a purple orb as the icon. Now you need to head back to Ikora again.
 

A CLOT OF DARKNESS – Return to Ikori Rey
Destination: Tower

INVECTIVE [UNCHARGED] – Purchase an Invective shotgun component from the Gunsmith
Destination: Tower
Now that we’ve talked to Ikora again it’s time to go to the Gunsmith, Exo. You will see a green arrow above his head, he is right next to the awkward looking tree in the very start of the tower. When you talk to him you will see that he has something purchasable on the top right corner. This is shotgun parts that Ikora needs. Except if you want to get the part [Golden Age Shotgun Magazine] from Exo you will need to trade in 50 Special Ammo Synthesis. You probably have a few already, so to get the rest just buy them right there from the Gunsmith. Each one costs 250 glimmer. So you’ll need a lot saved up. 50 special ammo consumables costs 12,500 glimmer! Once you have 50, which you can see tracked by highlighting the shotgun parts your about to trade in for, get the parts and be on your way.

INVECTIVE [UNCHARGED] – Return Invective to Ikora Rey so she can integrate the component
Destination: Tower
Now that we have the shotgun parts, take them back to Ikora in the Hall of Guardians in the tower. All we need to do now is just select the bounty as soon as we talk to her and BAM we have our brand new sexy exotic shot gun! The Invective!
Hope all of this has helped! Thanks!
-Bam

invective


A Light In The Dark – Exotic Weapon Bounty (Thorn – Hand Cannon)


Complete “The Summoning Pits” Strike on the Moon.
Destination: Moon
This first part is just to complete “The Summoning Pits” on the Moon which is a standard level 12 Strike.

DEPLETED HAND CANNON – Harvest the energies of Hive on the Moon to activate the weapons
Destination: Moon, The Dark Beyond Mission
You need to kill 500 Hive. The best place is the The Dark Beyond missions. Do it on a level that you can be damaged. Fight your way to the Temple of Crota. Here you want to kill the Hive that rush the door and then die BEFORE killing the Knight. This will respawn the encounter and you can farm kills until you have 500. If you have people with you their kills count towards your 500.

DEPLETED HAND CANNON – Use Void Damage to defeat Guardians in the Crucible. Death will slow your progress.
Destination: Crucible
First you have to have weapons with Void. That’s the Purple Swirl type of damage. You can play any list you want. You will get +5 points for each death due to Void damage and you will lose -2 points for every death you have. You need 500 points to advance to the next stage so if you are perfect this is 100 kills.

CORRUPTED HAND CANNON – Bring the hand cannon to the Speaker.
Destination: Tower

CORRUPTED HAND CANNON – Cleanse yourself and the weapon with an infusion of Light.
Destination: Tower
You need to buy this from the Speaker for 1 Mote of Light.

CORRUPTED HAND CANNON – Bring the weapon to Ikora Rey.
Destination: Tower
Ikora Rey is the Warlock Vanguard.

CORRUPTED THORN – Kill Xyor, the Unwed
Destination: Moon – Special The Summoning Pits Strike
This is a level 26 strike. You need to fight your way through to the final boss area with Phogoth. Now keep killing the Knights and Acolytes and all the other mobs but leave Phogoth alive. Xyor, the Unwed will spawn from the third drop ship that arrives at the bottom area. You can stay in the second room right before Phogoth and work enemies from there. Don’t stay in the room right outside as a Shrieker will spawn in this room. You then need to kill Xyor who is a high level Wizard. You can finish the Strike or leave once the bounty updates.

UNBOUND THORN – Return to the Speaker
Destination: Tower
Go to the Speaker and he will give you Thorn. Congrats you have a Exotic Hand Cannon.

exotic_thorn


A Voice In The Wilderness – Exotic Weapon Bounty (Super Good Advice – Machine Gun)


This is by far the easiest of all the Exotic weapon bounties. The only tricky part is that you have to wait til Xur shows up during the weekends. Other than that this will take you about an hour, if that.

A VOICE IN THE WILDERNESS – Search loot caches on Mars for clues.
Destination: Mars
You will randomly find the item you are looking for from loot chests. Just keep working standard farming loops through the city and caves until you get the item. It could be in the first or it could take you 20 or more chests. Just search through one area until you’ve looked at all the spots chests are found, if it’s not there move on. You can even look back in old spots where you already searched, a new chest might appear and it might be in there. You only need to find the one fortunate chest. It took me 20 minutes, it can take much shorter or much longer depending on your luck.

A VOICE IN THE WILDERNESS – COMPLETED- Hand in the Machine Gun
Destination: The Tower
Now what we need to do is go to the tower and visit the Gunsmith. This is extremely simple. Just head to the Gunsmith and he will give you the next step of the bounty, which is going to be checking in on Xur, the agent of the nine.

A MOURNFUL GUN – Acquire a Pristine Golden Age Ammunition Module from Xur, the Agent of the Nine.
Destination: The Tower
Xur is the agent of the nine who sells exotic goods on weekends for strange coins and motes of light. He moves around in many different places throughout the tower each week. For me he was under Future War Cult area in the Tower Hanger. Make sure you have one strange coin, if you don’t have one play the strike of the week and you’ll be rewarded with at least 3. There are other ways to get strange coins as well. Find Xur and you will be given an option to acquire a Pristine Golden Age Ammunition Module for one strange coin. Do that and you’re on to the next step.
(PS… Check out this handy page that tells you all of the goodness that Xur is selling each week! http://gameguidecentral.com/destiny-xur-agent-nine-exotic-stock/)

A PLEASED MACHINE GUN FRAME – Kill enemies with Machine Guns (500).
Destination: Anywhere (Moon: The Dark Beyond recommended)
I recommend buying some Heavy Ammo Synthesis from the gunsmith before you get going. You will get some heavy ammo drops, but it’s easier to buy a few of these instead.
You can kill 500 enemies with Heavy Machine Guns anywhere, but I think the best place is on Moon on the story mission THE DARK BEYOND. At just level 6 you will rip through the bad guys and there’s a part of the mission where you open a huge gate and swarms of Hive come rushing through like cockroaches on steroids. Play the mission up until the cut-scene when you try to revive a dead guardian. Kill all the enemies with your heavy machine gun EXCEPT FOR THE KNIGHT! DO NOT KILL THE KNIGHT! After you take down a bunch of the enemies stop shooting and let the knight kill you. If you allow the knight to kill you it will reset you at the beginning of the gate opening and you can destroy the hive over and over, picking up heavy ammo and using your synthesis when needed. Keep doing this until you get your 500 kills. It should take you less than 10 minutes.

AN ENTHUSIASTIC GUN – Bring the frame to the Gunsmith.
Destination: Tower
Last step is as easy as it gets. Fly back to the Tower and visit the gunsmith again. He will have your brand new shiny new gun smell exotic heavy machine gun waiting for you. The “Super Good Advice” is the name of the gun. It has high fire rate and slightly low impact. It’s got some good abilities to unlock like really fast reload and much higher stability. It’s special features are that it get’s upgraded damage for a period of time with a kill and missed shots have a good chance of returning directly back into the clip.
I hope this helped, good luck and thanks!
-Bam

super_good_advice


Toland’s Legacy – Exotic Weapon Bounty (Bad Juju – Pulse Rifle)

Complete a Weekly Heroic or Nightfall Strike.
Destination: Standard Weekly or Nightfall Strike.
Obviously the weekly will be a lot easier to complete.

TOLAND’S JOURNAL [FRAGMENTED] – Bring the Journal to Ikora Rey, the Warlock Vanguard in the Tower.
Destination: Tower

TOLAND’S JOURNAL [FRAGMENTED] – Track down the fragments of Toland’s Journal by completing Strikes on any Destination
Destination: Strike Playlist
You now need to complete 25 strikes of any kind. You can directly pick from a planet, do Strike Playlist, Weekly, Nightfall whatever just do 25 to completion.

TOLAND’S JOURNAL [ENCRYPTED] – Bring the Journal to Ikora Rey
Destination: Tower
For the millionth time. Ikora Rey is the Warlock Vangaurd.

TOLAND’S JOURNAL [DECRYPTED] – Bring the Journal to the Gunsmith

BLACK MARKET COUPON – Obtain a darkness infused weapon frame from Xur.
Destination: Tower
Xur is only in game from Friday morning to Sunday morning. His location changes week to week. This part will cost you 1 Strange Coin.

DARKNESS-INFUSED WEAPON FRAME – Bring the weapon frame to the Gunsmith

DARKNESS-INFUSED PULSE RIFLE – Defeat Guardians in the Crucible.
Destination: Crucible
10,000 points. No negatives for deaths just grind the kills out.

SATED PULSE RIFLE – Return the weapon to the Gunsmith.
Just go back to the Gunsmith and he will give you your brand new Exotic Bad Juju!

bad_juju

Destiny – Loot Farming Guide – Lots of Areas

This entry is part [part not set] of 15 in the series Destiny

There are a lot of reasons to loot farm in Destiny. You want engrams and don’t have a team to do Strikes or you think Strikes are repetitive and boring and it’s not fun or profitable to have to spend 10 or so minutes to kill a boss that doesn’t even have a loot table. Turning in Engrams also levels up your Crypto-Archeology level and every time you gain a level you will get free Engrams from the Postmaster.

Also farming materials (Spinmetal for one) helps raise Crucible and Vanguard faction and provides super easy Marks. Materials are also needed to upgrade Legendaries and Exotics. In case you didn’t know you can turn a 50 stack of materials to either the Vanguard Quartermaster in the Hanger or the Crucible Quartermaster downstairs and they will give you +25 Faction and +5 Marks (as long as you are below your 100 weekly max). There is also a bonus that if you kill 1,500 enemies on a planet then more materials will drop. It’s not very specific but I’ve started to get 2 from a material node instead of the standard 1 over half the time.

Am working on vids and keeping track of stats to really show what each area is capable of.

Earth – Skywatch (Patrol)

UPDATE 9/25/2014 = Patch 1.0.1.5 – Bungie has removed the Cave via patch! Other options still working at this time.
This by far the best found so far. Then you get to Skywatch head to the left and there will be a small hill. There are several concrete slabs sticking out of the ground. You want to be on these but NOT in front of them. Look towards the building in front of you and there is a small cave below it that should have a never ending stream of Hive coming out. Just keep blasting them until you get bored. The best part is you can just sit there and go AFK and take turns doing the shooting and the loot will still drop. The biggest issue is that if even one Hive gets out you need to eliminate them before more will spawn. Things that mess this up are other people who get too close to the cave kills the spawns and there is a non-public event war that happens with pretty high level mobs that can kill you if you go AFK. If the Hive get out of the cave you need to kill them all or the spawning will stop. Please note you can NOT loss Legendaries. I know its exciting to see but they will be waiting for you later. Don’t go running into the cave killing the spawn every little drop you get.

PROS:
1 – Lots of enemies to kill
2 – Can be done Solo but due to number of Hive 2 is recommended

CONS:
1 – No Material drops
2 – Other players can grief the location
3 – Even one Hive out of the area equals no new spawns

Moon – The Dark Beyond (Mission) – Temple of Crota Entrance

Options: Levels 6, 9, 20, 24, 28
Setup Time: 8 minutes
I did this on level 24. The doors will open and a FLOOD of Hive will come right at you. Just shoot straight ahead and take as many as you can before they kill you. DO NOT clear the entire area. You want to die and restart. I’ve now done this on level 6, 9, 20 and 24 and see no difference in drops so do it so that you can get the kills but the enemies still kill you without you having to stand there and take it for awhile.
Stats: Level 24 – :30 of farming – 1 Leg, 4 Rares, 18 Greens – 785 kills

PROS:
1 – Lots of enemies to kill
2 – Can be done Solo
3 – Range of level options
4 – Instance, so no interference

CONS:
1 – No Material drops
2 – If you do too well you will checkpoint past the area and need to restart the entire mission

Venus – The Nexus (Strike)

Level 14 Only
Setup Time: 10 minutes
You will want a full team as randoms will definitely ruin this. You need to fight all the way to almost the end. You will come to a cave section with some warning tape. Once you clear this cave you will be out on a ledge. There will be a large drop of Vex at the end to kill. Once you kill them all the entire team leaps to your death to reset.
Success: :90 of farming – 1 Leg, 9 Rares, LOTS of Greens

PROS:
1 – Instance, so no interference

CONS:
1 – Need a full fireteam
2 – No Material drops
3 – Ledge could lead to possible loot loss

Earth – Devil’s Lair (Strike)

Level 9 Only
Setup Time: 0 minutes
This is a loop farming of Spinmetal and Crates in the opening area of the Devil’s Lair Strike mission on Earth. Technically you can spawn into the instance and get matched up with a Fireteam and just stay in the opening area. The bonus to having a team in here is that there is a Public Event that spawns and also to just not be a dick to other players trying to do the Strike leaving them a man short and you just stay in the opening area.

PROS:
1) Instant set-up
2) Spinmetal
3) Public event possible

CONS:
1) Strike mission so randoms
2) Not many engrams
3) Higher level area so lower level Guardians could die repeatedly

Moon – Archer’s Line (Patrol)

Level Whatever
Setup Time: 0 minutes
This is a cave farming loop around the very first opening area for Loot Chests and Helium Fragments. We are checking all the caves and all the building along with a few other open areas for chests and materials to pick up. Always make sure to check the large building in the back as this is a 90% loot location with probably a 10% chance of having 2 loot crates. If you do the full loop it should be respawned by the time you get back.

PROS:
1) Low level area so safe
2) Possible Public Events
3) Materials

CONS:
1) Low engram chance
2) Other players are running around messing with spawns

Earth – Forgotten Shores (Patrol)

Level Whatever
Setup Time: 1 minute
This is a cave loop on the Forgotten Shores. There are 5 caves and the ship hulls to look through. It’s a high traffic zone though so be prepared for some competition for loot chests. There are public event and there are also Captains with some large range that will be shooting at you. The bonus to this area is you can get to everything while on your Sparrow so it’s a pretty quick loop. People say chests spawn on the rocks on the road up to Skywatch but since you have to get off your Sparrow to do it, I skip it unless I can see one as I fly by.

PROS:
1) Low level area so safe
2) Possible Public Events
3) Materials

CONS:
1) Low engram chance
2) Other players are running around messing with spawns